How to Make Builder-Grade Cabinets Look Custom: 10 High-Impact Upgrades

When we moved into our home, our kitchen had the same basic builder-grade cabinets you see in so many newer houses, nothing like the custom look I was going for. Learning how to make builder-grade cabinets look custom without replacing them became one of my favorite kitchen projects.
You don’t need to completely transform with open shelving to update your builder grade kitchen. Light fixtures, a different color, even a darker color can be an effective way to make yourself a custom kitchen.
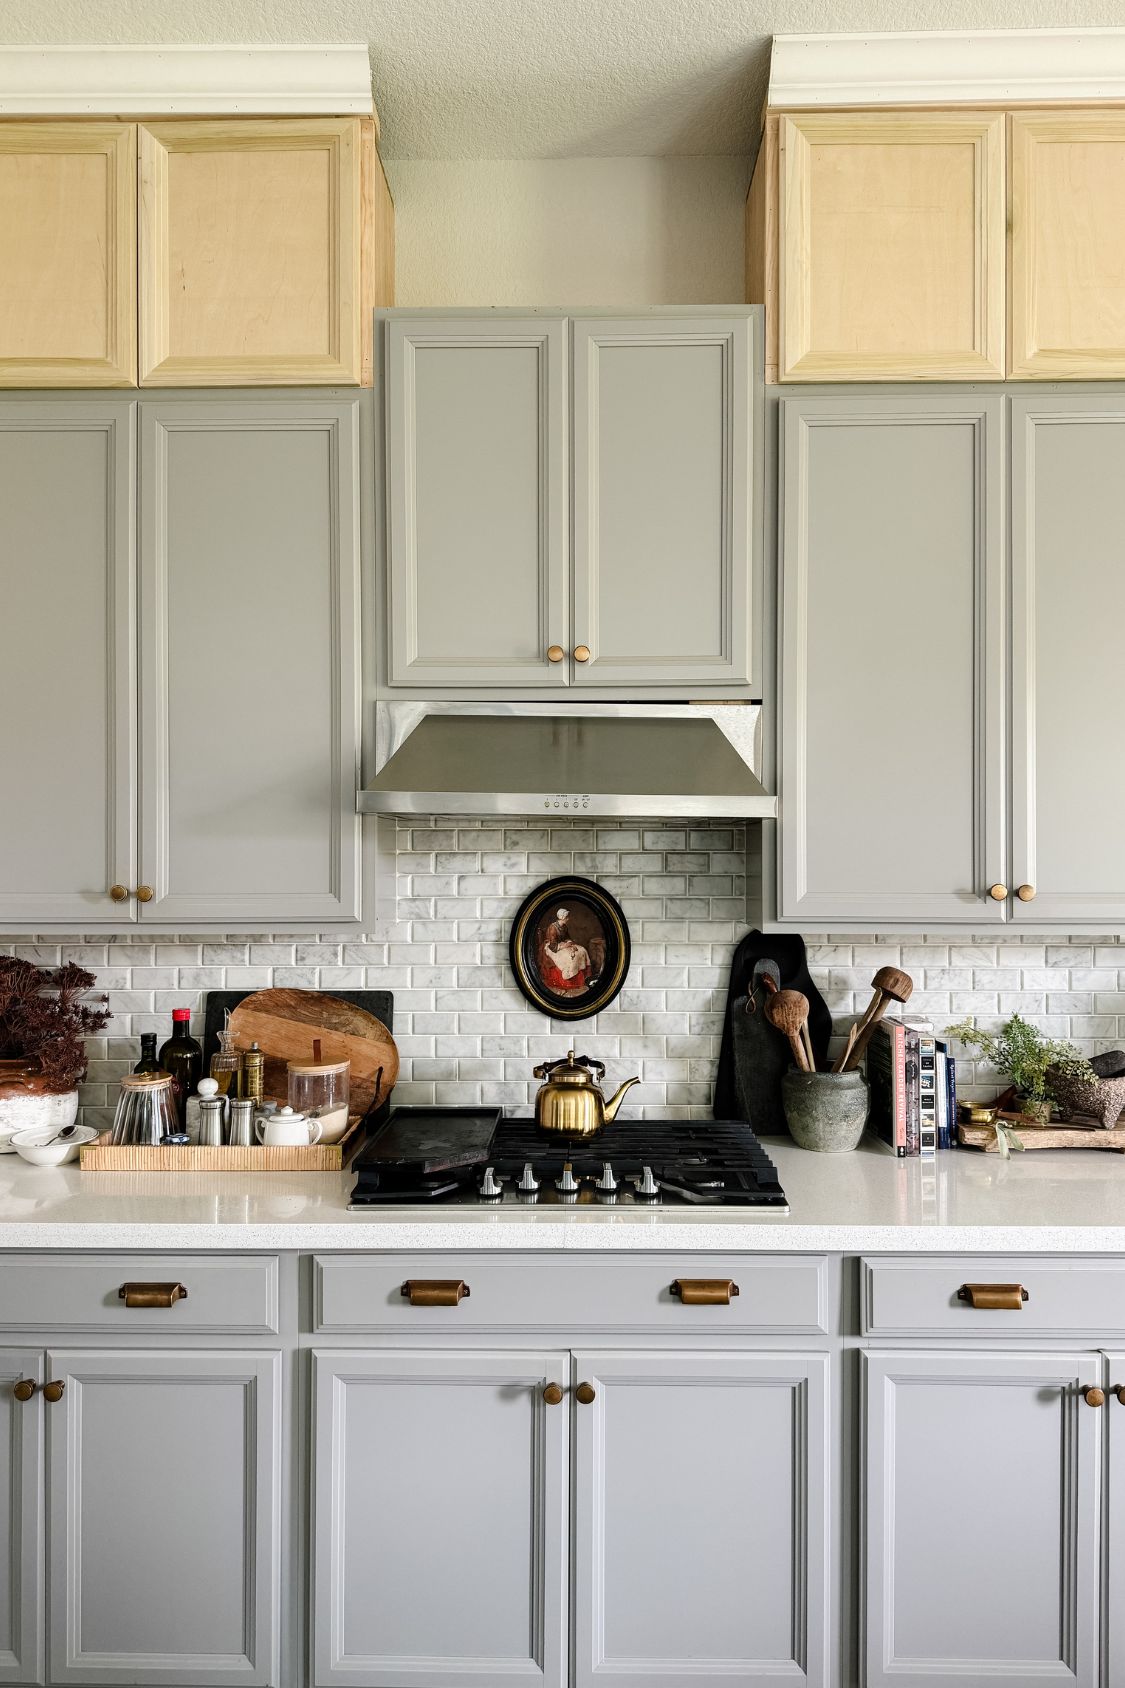
The kitchen design I walked into was decent enough. The cabinets were brand new and in an inoffensive color. But they stopped short of the ceiling and lacked the architectural details that make a kitchen feel thoughtfully designed. They need some small changes to fit what I was going for.
Instead of ripping everything out, I slowly upgraded what we already had. Today those original cabinet boxes are almost unrecognizable.
We got lucky with our kitchen backsplash, a beautiful Carrara marble subway tile, so I didn’t replace that.
Builder grade cabinets are usually designed to be affordable and broadly appealing, not custom. Basic doors, a big gap above the upper cabinets, minimal trim, standard or no hardware, and little variation in depth are the giveaways.
If your cabinet boxes are solid and the layout works, replacing everything may not be necessary. The good news is that a few strategic upgrades, layered together, can completely change the mood of the room.
Some of these are small projects you can finish in an afternoon. Others take more planning. Choose what fits your kitchen, your budget, and your DIY comfort level.
Start by Evaluating Your Existing Cabinets
Before spending time or money, figure out whether your existing cabinets are a good candidate for a makeover rather than a full remodel.
Check whether the cabinet boxes are solid and securely attached, whether there’s water damage or warping, and whether the doors and drawers still close properly.
If the boxes are wood, plywood, or MDF and the layout still works for your kitchen, upgrading is usually the more affordable option. If the layout seriously limits function or the boxes are damaged, replacement may be the better call.
Extend the Upper Cabinets to the Ceiling

Extending your upper cabinets to the ceiling makes the single biggest difference in how custom a builder-grade kitchen feels.
It eliminates the awkward, dust-collecting gap above the cabinets. It draws the eye upward and makes the whole room feel more architectural.
I built simple boxes above our existing upper cabinets, added trim to disguise the transition between old and new sections, and finished the top with crown molding.
Painting everything together, top of the cabinets included, is what makes it read as one continuous, custom installation instead of an addition.
Replace Basic Cabinet Doors and Hardware

New cabinet doors and new hardware change more of a kitchen’s visual interest than almost any other upgrade, since doors make up most of what you actually see.
Shaker doors give a clean, timeless look, while raised panel doors lean more traditional. Glass doors or reeded glass fronts are a great way to break up a long run of solid lower cabinets or upper cabinetry.
Hardware works the same way. I use knobs on doors and pulls on drawers, and in my own kitchen I mixed unlacquered brass with matte black Café appliances rather than matching every finish exactly.
Substantial hardware, sized correctly for the door, is what makes even a simple profile look intentional.
Add Trim, Panels, and Clean Transitions

Trim and finished end panels are what separate an “updated” kitchen from a genuinely custom one. Custom cabinetry is built to fit the room instead of just bolted to the wall.
Crown molding, light rail molding beneath the upper cabinets, and scribe molding where cabinets meet an uneven wall all help connect the boxes to the surrounding architecture.
The same goes for finished end panels on any exposed cabinet side, plus small transition details like matching toe kicks and properly sized filler strips next to the refrigerator.
These are the details that make a kitchen look custom from every angle, not only from the front.
Transform the Kitchen Island

A kitchen island is one of the best places to add a custom, focal-point detail. It’s visible from several directions and sits at the center of an open floor plan.
I covered our builder-grade island in layered decorative trim, then used a dark stain instead of paint for a finish reminiscent of an old English pub.
The contrast between the stained island and the painted perimeter cabinets gives the whole kitchen a focal point.
Vertical tongue and groove paneling, beadboard, or a simple Shaker style box molding all work if stain isn’t the direction you want.
Choose the Right Cabinet Paint

Cabinets get touched, cleaned, and bumped constantly, so regular wall paint won’t hold up the way a dedicated cabinet enamel will.
An enamel paint in a satin or semi-gloss finish is usually the right call. Higher sheen holds up better and shows fewer imperfections over time.
Most of a cabinet makeover actually happens during prep, not painting. Beautiful doors and expensive paint can’t disguise grease, rough sanding, or unfilled seams.
I’ve put together a full breakdown of my favorite paint for kitchen cabinets, including the best primer for oak cabinets if tannin bleed-through is a concern.
I also covered whether brushing, rolling, or spraying gives the best result for your specific kitchen. Sherwin-Williams’ Emerald Urethane Trim Enamel is one of the more durable options built specifically for cabinets, doors, and trim.
Add Lighting and a Focal Point

Under-cabinet lighting and a defined focal point around the range are two of the most affordable ways to make a kitchen feel finished rather than just updated.
Under-cabinet lighting highlights the backsplash and countertop space. It makes the upper cabinets feel lighter and adds real task lighting for cooking.
Choose warm white light rather than a harsh blue tone, and use a light rail to hide the fixture itself.
For a focal point, look at your range wall. I added a brass rail above our cooktop and let the beveled Carrara marble backsplash do the rest.
Warm metal details, pendant lights, or a slightly more substantial vent hood can all create that same sense of intention.
Let the Surrounding Finishes Catch Up

Even beautifully updated cabinets can still feel builder grade if everything around them stays disconnected.
Wallpaper softens a kitchen full of hard surfaces, and repeating materials throughout the room ties the whole design together.
In our kitchen, floral wallpaper added pattern, the stained island brought in warmth, and brushed bronze and unlacquered brass connected the marble, the matte black appliances, and the cabinetry.
The breakfast nook helps the kitchen and the adjoining eating area read as one complete design instead of two disconnected spaces.
How Much Does It Cost to Make Builder-Grade Cabinets Look Custom?

Costs break down roughly into three tiers.
Small budget updates include new hardware, under-cabinet lighting, paint, and a decorative rail above the cooktop. Midrange updates include replacement doors and drawer fronts, soft-close hinges, island paneling, and crown molding. Larger investments include extending cabinetry to the ceiling, a custom vent hood, and new countertops or backsplash.
You don’t need to do all of this in one project. Our kitchen is proof that a makeover completed in phases, over time, still adds up to a custom result.
It’s also a financially sound approach. A minor kitchen remodel that keeps the existing cabinet boxes, the category most of these upgrades fall under, recoups an average of 96.1% of its cost, which is one of the best returns of any interior project.
Which Cabinet Upgrades Make the Biggest Difference?
In order of impact: extending the upper cabinets to the ceiling, replacing dated doors and drawer fronts, and painting everything in one professional finish.
After that: adding finished end panels and molding, upgrading the island, replacing undersized hardware, improving lighting, and creating a focal point around the range.
Mistakes to Avoid
The most common mistakes are painting cabinets without cleaning them thoroughly, skipping primer, and using regular wall paint on high-use cabinetry.
Choosing hardware that’s too small for the door, ignoring exposed cabinet sides, and updating one feature without considering the kitchen as a whole are close behind.
Above all, don’t assume every cabinet needs to be replaced for the room to feel different.
Our kitchen didn’t transform through one massive renovation. I kept the original cabinet boxes and upgraded the room in phases.
That meant extending the cabinets to the ceiling, replacing the doors, and adding trim, hardware, wallpaper, marble, and a completely new look for the island.
Each project made a difference on its own. But layering those details together is what finally made the kitchen feel custom.
Frequently Asked Questions

Can you make builder-grade cabinets look custom without replacing them?
Yes. If the cabinet boxes are solid and the layout works, upgrades like extending the cabinets to the ceiling, replacing the doors, adding trim, and updating the hardware can make them look completely custom.
What is the single best upgrade for a builder-grade kitchen?
Extending the upper cabinets to the ceiling tends to make the biggest visual difference, since it removes the awkward gap above the cabinets and makes the whole kitchen feel more architectural.
Do I need to paint or replace cabinet doors to get a custom look?
Not necessarily. Paint alone, done with the right prep and a cabinet-specific enamel, can transform builder-grade cabinets. Replacing the doors is a bigger step up in cost but changes more of the kitchen’s overall style.
How much does it cost to make builder-grade cabinets look custom?
It depends on the scope. Small budget updates like hardware, lighting, and paint can cost very little, while extending cabinets to the ceiling, adding a custom vent hood, or replacing countertops fall into the midrange to larger investment tiers.
Is it better to reface cabinets or replace them entirely?
Refacing is usually the better choice if the boxes are structurally sound and you like the existing layout. Full replacement makes more sense if the cabinets are damaged or you need to change the kitchen’s configuration.
This post contains affiliate links to products that I used or recommend. If you purchase something through an affiliate link, I may receive a small percentage of the sale at no extra cost to you. I really appreciate your support!